Termite Inspections & Treatment: Complete Guide
I’ve inspected over 3,000 Sunshine Coast properties in 15 years, and I can tell you this: every property owner asks the same question after we find termites—”How long have they been here?” The answer is usually months, sometimes years. Termites are called silent destroyers for good reason—they eat your home from the inside out while you sleep, work, and live normally.
The good news? Early detection prevents catastrophic damage. A $300 annual inspection can save you $15,000+ in repairs. Let me show you what professional termite management actually looks like on the Sunshine Coast.
Table of Contents
- Signs You Have Termites
- The Real Cost of Termite Damage
- What Happens During a Professional Inspection
- Treatment Options Explained
- What to Expect During Treatment
- Prevention Tips
- FAQ
- Schedule Your Inspection
Signs You Have Termites (What to Look For)
Most homeowners don’t see termites until damage is severe. Here’s what actually indicates termite activity:
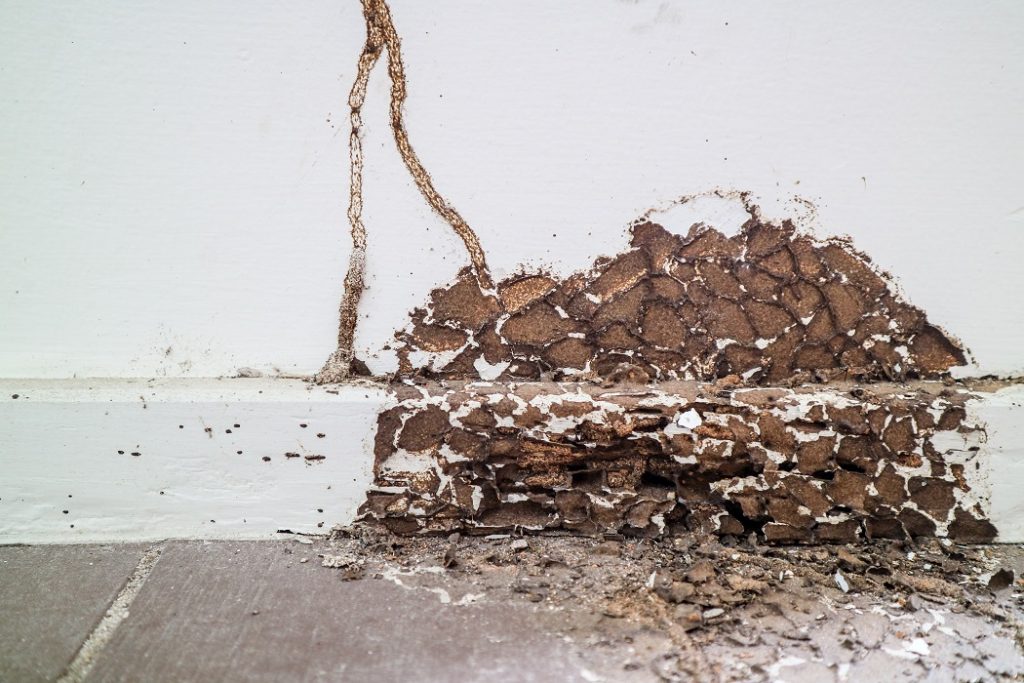
1. Mud Tubes (Most Common Sign)
- What they are: Pencil-width tunnels made of soil, termite saliva, and feces
- Why termites build them: Protection from light, air, and predators while traveling between nest and food
- Where to check: Foundation walls, slab edges, under house, fence posts, inside meter boxes
- What to do: Don’t disturb them. Call for inspection immediately. Breaking tubes alerts colony
2. Flying Termites & Discarded Wings
- When: September-March, particularly after rain (peak: January-February)
- What they look like: Creamy-white winged insects, 5-8mm long, attracted to lights
- What wings mean: Alates shed wings after mating. Piles near windows/doors = mature colony within 50-100m
- Inside vs outside: Swarmers inside house = high concern. Outside only = colony nearby, inspect within 1-2 weeks
3. Hollow-Sounding Wood
- Tap door frames, window frames, skirting boards with screwdriver handle
- Solid timber sounds dense; termite-damaged timber sounds hollow/papery
- Check subfloor stumps and bearers if accessible
4. Structural Warning Signs
- Doors or windows that suddenly stick (timber swelling from termite moisture)
- Blistering or bubbling paint (looks like water damage)
- Sagging ceilings or floors (advanced damage)
- Cracking in walls or cornices
- Soft spots in flooring
5. Termite Droppings (Frass)
- Note: Subterranean termites (most common on Sunshine Coast) DON’T produce visible droppings—they use it to build mud tubes
- Drywood termites (rare here) produce small pellet-shaped droppings
- If you see sawdust-like piles, more likely borers or carpenter ants
Real Example: Buderim client called about “paint bubbling” in bedroom. Inspection found active Coptotermes termites in wall cavity—they’d been there 8-12 months based on damage extent. The bubbling paint was moisture from termite activity. Early inspection would have caught them before they reached bedroom walls. Damage repair: $4,200. Treatment: $3,800.
The Real Cost of Ignoring Termites
Average Costs We See on Sunshine Coast:
- Minor damage (caught early): $1,000-$3,000 treatment + $500-$2,000 repairs
- Moderate damage: $3,000-$4,500 treatment + $5,000-$10,000 repairs
- Severe damage: $4,000-$5,000 treatment + $15,000-$30,000+ repairs
What Makes Damage Expensive:
- Roof trusses/ceiling joists ($8,000-$15,000 to replace)
- Floor bearers/stumps in Queenslanders ($5,000-$12,000)
- Wall framing ($3,000-$8,000 per room)
- Emergency roof support if structural compromise ($4,000+)
Insurance Reality:
- Most home insurance EXCLUDES termite damage
- You pay 100% of treatment and repair costs
- Many insurers require proof of annual inspections for OTHER claims to be valid
What Happens During a Professional Termite Inspection
A proper termite inspection to Australian Standard AS 3660 takes 45-90 minutes for an average house. Here’s what we actually do:
Pre-Inspection
- Review property history and previous inspection reports (if available)
- Note property type, construction, age
- Identify areas of concern based on visual assessment
External Inspection
- Check entire perimeter for mud tubes on walls, foundation, slab edges
- Inspect garden beds, retaining walls, fence posts
- Check tree stumps, stored timber, firewood
- Look for conducive conditions (timber-soil contact, moisture issues, poor drainage)
- Inspect deck supports, pergola posts, outdoor structures
Internal Inspection
- Sounding: Tap all accessible timber (frames, skirting, architraves) listening for hollow sound
- Moisture readings: Use moisture meter to detect high readings (termites need moisture)
- Visual inspection: Check for mud tubes, damaged timber, blistering paint
- Bathrooms/laundries: High-risk areas due to moisture
Subfloor/Roof Void Inspection
- Enter subfloor (if accessible) to inspect stumps, bearers, joists
- Check roof void for termite activity in trusses and framing
- Use thermal imaging (if available) to detect termite heat signatures
Monitoring Station Check
- If monitoring system installed, check all stations for termite activity
- Record station condition and wood consumption
Report & Recommendations
- Written report with photos of findings
- Species identification if termites found
- Extent of damage assessment
- Treatment recommendations
- List of conducive conditions to address
- Cost estimate for treatment
Cost: $250-$350
Duration: 45-90 minutes
Termite Treatment Options: Which One Do You Need?
There’s no one-size-fits-all termite treatment. Choice depends on your property type, construction, infestation severity, and budget.
1. Chemical Soil Barrier
How It Works:
- Drill and inject liquid termiticide (Termidor, Altriset) into soil around entire house perimeter
- Creates treated zone 150-300mm wide that kills termites on contact
- Termites can’t detect barrier so walk through it and die
- Also applied under slab if drilled access possible
Cost: $2,500-$4,500 depending on house size and access
Duration: 5-8 years protection
Best For:
- Slab-on-ground homes
- Reactive treatment (termites already present)
- Properties where drilling is feasible
Process:
- Drill holes through concrete paths, driveways, slabs (every 200-300mm)
- Inject termiticide under pressure to create treated zone
- Patch holes with concrete (color-matched where possible)
- Install warning notices (required by law)
Pros:
- Immediate protection once installed
- Long-lasting (5-8 years)
- Kills active termites quickly
Cons:
- Requires drilling (can be invasive)
- Difficult with extensive landscaping, water features
- Higher upfront cost
2. Termite Monitoring & Baiting System
How It Works:
- Install monitoring stations (10-15 around property perimeter)
- Stations contain wood/cellulose that attracts termites
- Check monthly/quarterly for termite activity
- When termites detected, replace wood with bait containing insect growth regulator
- Termites feed and take bait back to colony
- Colony dies over 8-12 weeks
Cost:
- Installation: $2,000-$3,000
- Ongoing monitoring: $300-$500/year
- Bait (if termites detected): $500-$1,000 additional
Duration: Ongoing (stations last 5+ years, monitoring continues indefinitely)
Best For:
- Properties where chemical barriers difficult (extensive gardens, ponds, decking)
- Preventative protection
- Environmentally-conscious homeowners
- Properties with ongoing high termite pressure
Pros:
- No drilling or chemical application to soil
- Early detection system (alerts you to termite presence)
- Targets and eliminates entire colony
- Low environmental impact
Cons:
- Ongoing monitoring required (monthly/quarterly checks)
- Annual cost adds up over time
- Takes longer to eliminate colony (8-12 weeks)
- Relies on termites finding stations
3. Physical Barriers (New Construction Only)
How It Works:
- Installed during construction
- Materials termites cannot penetrate: stainless steel mesh, graded stone, chemically-impregnated sheets
- Creates physical barrier between soil and timber
Best For: New builds, major renovations where foundation is exposed
Note: Cannot be retrofitted to existing homes in most cases
Which Treatment Do I Need?
You likely need a chemical barrier if:
- Active termites found in house
- Slab-on-ground construction
- You want immediate, long-term protection
- Drilling around property is feasible
You likely need a monitoring system if:
- Extensive landscaping makes chemical barriers impractical
- You want ongoing termite detection
- No active infestation currently (preventative)
- You’re willing to commit to ongoing monitoring
Your pest controller will recommend based on your specific situation. Sometimes a combination approach is best.
What to Expect During Termite Treatment
Timeline for Chemical Barrier Installation
Day 1: Installation (4-8 hours)
- Mark drilling locations around perimeter
- Drill holes through concrete paths, driveways, slab edges
- Trench and treat soil in garden bed areas
- Inject termiticide under pressure
- Patch all drill holes
- Install warning notices
Week 2-4: Follow-up
- Inspect for continued termite activity
- Additional treatment if needed
Ongoing:
- Annual inspections to confirm barrier integrity
- Barrier lasts 5-8 years before renewal needed
Timeline for Monitoring System
Day 1: Installation (2-4 hours)
- Install 10-15 monitoring stations around perimeter
- Stations placed 3-4 meters apart
- Filled with wood/cellulose attractant
Ongoing: Monthly/Quarterly Checks
- Technician inspects all stations for termite activity
- If termites found, bait installed
- Monitor bait consumption until colony eliminated (8-12 weeks)
What You Need to Do
Before Treatment:
- Clear access around house perimeter (move pot plants, outdoor furniture)
- Ensure technicians can access subfloor/roof void
- Identify any areas of concern to point out
During Treatment:
- You can remain home (treatment is external)
- Keep pets inside during drilling/chemical application
- Drilling is noisy—warn neighbors if needed
After Treatment:
- Keep treated zone undisturbed (no digging within 6 months)
- Don’t plant trees/shrubs in treated zone
- Inform any contractors about termite treatment (plumbers, landscapers)
- Schedule annual inspections
Prevention: Reducing Your Termite Risk
Even with professional treatment, removing conducive conditions reduces future risk:
1. Eliminate Moisture:
- Fix leaking taps, pipes, gutters immediately
- Improve drainage (grade soil away from house)
- Ensure subfloor ventilation adequate
- Clean gutters quarterly
2. Remove Timber-Soil Contact:
- No timber touching ground (lattice, garden edging, fence posts)
- Keep mulch 300mm from house walls
- Remove tree stumps
- Store firewood elevated and 5+ meters from house
3. Regular Inspections:
- Annual professional inspection (non-negotiable)
- Monthly self-checks for mud tubes
- Monitor after heavy rain or storms
Frequently Asked Questions
How long does termite treatment take?
Chemical barrier installation: 4-8 hours depending on house size and access. Monitoring system installation: 2-4 hours. Colony elimination (baiting): 8-12 weeks from first bait consumption.
Can I stay home during treatment?
Yes. Treatment is external. Keep pets inside during chemical application. Normal access after treatment complete (same day).
Will I see dead termites after treatment?
Not necessarily. Chemical barriers kill termites underground as they pass through. You may see reduced activity in mud tubes over 1-2 weeks. Baiting systems eliminate colony underground—you won’t see dead termites.
Do I still need inspections after treatment?
Yes. Annual inspections confirm barrier integrity and detect any new termite activity. Treatment protects against current colony but new colonies can attack from different directions.
What’s the warranty on termite treatment?
Varies by company and treatment type. Most offer 1-5 year warranties on chemical barriers (free retreatment if termites breach barrier). Baiting systems: ongoing protection as long as monitoring continues. Always get warranty terms in writing.
Can termites come back after treatment?
Treatment eliminates current colony. New colonies can attack later if conducive conditions remain. This is why annual inspections and barrier maintenance are essential. Properly maintained chemical barriers provide 5-8 years protection.
Schedule Your Termite Inspection on the Sunshine Coast
Don’t wait for visible damage. Annual inspections catch termites early when treatment is cheaper and damage is minimal.
Why Choose Little Critters Pest Control:
- 15+ years Sunshine Coast experience
- Licensed Queensland Pest Management Technicians
- AEPMA members with specialist termite accreditations
- Termidor and Altriset certified installers
- Comprehensive inspections to AS 3660
- Detailed reports with photos
- Upfront pricing, no hidden fees
Request A Quote
Protect your home with professional termite management. Request a Quote for a termite inspection or treatment today.
CONTACT US TODAY
to learn more about our services and how we can help protect your home and family